Wednesday, July 28, 2010

5. An Objective Beginning - Sandbags WIP/H2


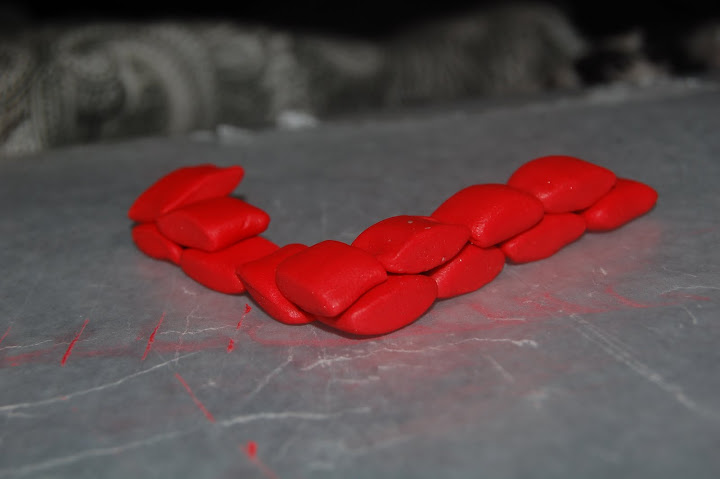
As I said in my last post, I'm going to be working on an objective marker this week. I didn't know where to start so I decided to go with something I didn't know how to do: Sandbags. There proved to be no tutorial on FTW so I just went with what I thought might work. It turned out well I feel. Everything is clickable.

I decided to go back to grade school for this one and got out some clay that I picked up at walmart for $.97, which is one of the best 40k investments I've made. I took the red out of the 4 colors. I'm hoping that it will give a gritty undertone to the bags when they are finished. I rolled the clay into a log, on some wax paper to prevent sticking, and flattened it slightly to the size I wanted my sandbags to be. Then I took a kitchen knife and cut through the clay in appropriate sections, as seen below.


Next I pinched the ends to create a nice tapering. Make sure to smooth all the edges so that the block looks like a bag instead of a chunk of clay.


Stack as sandbags would go and then ta-da. Not super difficult but still something that might help someone. I'll probably prime them black and paint them a tan. Keep watching for more.


I'll be in the P.I.T.S. as always.

Thursday, July 22, 2010

4. Recall and Projection: My First Full Week

This is the first of what I hope will be weekly updates that will let you know about my week, which is mostly made up of painting and planning with a day of gaming Tuesday, and share my hopes for the coming week.

So lets start with Recall.

Tuesday, I lost both of my games at my local gaming store. The first was a 1750 game against Chaos Marines. The fellow who plays them is a friend of mine who consistently beats my, despite my amendments to my army list. It seems I may need to make a sacrifice to the dice gods very soon. Suggestions on a 1500 Wolf list that could do something against CSM would be swell.

As for my next game, a new gamer at the shop who primarily proxies with paper ran an armor heavy IG list at a 1500 point value. On turn 2, he had eliminated my Long Fangs which was my only answer to armor which lead to a short game, him winning 4 kill points to my 3. I feel my Wolves did well all things considered there. Such is life and better luck next week.

Painting was fun, as I got a tutorial up and running which you can see here. Which brings me to the most exciting news! I was accepted into the FTW Blog Group and they even linked my meager tutorial to their tutorial page.

All in all, this was a good week.

Now for Projection.

Objectives!
I've seen a lot of cool ones over the week.

Each picture is clickable so take a look at the people who created them. I must say, my personal favourite is just above, created by Admiral Drax. All of these have inspired me to do my own which should be my whole project for the next week, assuming funds permit. Here's a hint: Sniper nest.

That's all for now!

I'll be in the P.I.T.S. of Fenris.

Monday, July 19, 2010

3. Snow Camo How To


One thing that I haven't found, and maybe I have just missed it, is Snow Camo. Granted, not many people have a distinct need to put snow camo on their troops and even if they did, painting things white can be enough. However, if you are playing IG Vostroyans or Space Wolf Snipers, you may not be okay with leaving things simply white. So I have an easy way to punch up that white and make it look like camo. All the pictures should be clickable.

Lets start with something nice and black.


Clean and easy primed black.


I like to run a light gray over the black. I do this for two reasons. First, it makes the white easier to paint. Secondly, it adds a bit of shadow on the model that I happen to like. This step is optional however and not necessary for the final look.


Next take white and paint a minimum of two coats. The brighter the white the higher the contrast later.


Take the same gray that you undercoated the white with and make small, random blotches about the area. It doesn't have to be pretty or neat, as you can see above. Now the thing to remember here and in the step below is that making camo to scale doesn't work for mini painting.


Take a liner brush or just whatever you happen to have that is tiny and run black lines over the top of the gray spots. If you don't have a tiny brush, a toothpick can work just as well and make even smaller lines, if that is what you desire. It is important to do this after the spots are down or else you will end up with a highly cluttered area that looks too busy and not very camo. And that is it. Simple.

Hope this helped someone. Feel free to post your tips and tricks in the comments if you have a better idea or a suggestion. If you're looking for something different, this and many other tutorials can be found here.

-Writing from the P.I.T.S. on Fenris.

Friday, July 16, 2010

2. My First Finished Mini


So a few days ago I finished this guy fully and decided that I should probably take some pictures and put them online. Today I learned that I was terrible at photography. However, over the course of an hour I did manage to get a few pictures that I feel appropriately showcase my average level of painting expertise. I'm honestly quite happy with this model, as I just started painting. So without further ado, I present to you: my Wolf Lord!


Be Afraid!
I am pleased with this shot primarily because of the way the skulls on his backpack look. I did them very simply by starting them white then placing a bone white over to give them a bone feel. Obviously.


Here you can see the detail on the wiring of his Wolf Claw. I am actually quite pleased with it.


It was actually a lot of fun doing his backpack. I tried to make the sword as realistic as possible, as if he might be able to use it.


I feel like I should inscribe something on his shoulder pad but I'm honestly not sure what to put or even how to put it. If anyone has any suggestions there, please let me know.


And because I am perpetually Playing in the Snow, I had to showcase this picture. I'd like you to note the snow that his right boot is kicking up. I hoped that it would look like he was running. I hate to say but you can only really tell if you look up close so I'll have to try to make the effect more dramatic next time I try something like this.

Thanks for reading. I'll be in the P.I.T.S. of Fenris.

Wednesday, July 14, 2010

1. Starting Things Off

So I've noticed that blogging about your army is a thing that is fairly common. Especially if you're doing something fun. Which I hope I am.

I play Space Wolves. But I don't like how the models look. Actually I quite like the flavor and look of the Dark Angels. More specifically, I enjoy the Guardians of the Covenant. Red flowing robes and warrior monks all sound pretty fantastic to me. However, since I am using those nice Space Wolf rules, I'm attempting to meld the two together. The main way I'm doing this is by putting all the models on bases that represent Fenris.

That means snow. Lots and Lots of it.
Snow Bases.
Snow Cammo.
Snow on the tank tracks.
Snow everywhere.
It is the sand of the tundra.

So this blog will (hopefully) be about my trials and successes with snow. And my army. Pictures will come later as I have painted a total of about....3 people and none of them fully. Lets hope this works out well.